Posted on Sun, 03 Jan 2016
How to setup a fully authenticated mail server on CentOs 7.
postfix + dovecot + amavisd + opendkim + letsencrypt + webmail on CentOS 7
How to setup a fully authenticated mail server on CentOs 7.
This howto will cover basics of setting up a postfix mail server with dovecot POP and IMAP client. Furthermore, we will show how to ensure our emails are not flagged as spam and are accepted by big email providers such as gmail. In the end we will setup webmail client and will sign our email and web server with an official certificate authority using letsencrypt.org.
Acknowledgments
This howto wouldn’t have happened if it weren’t for two excellent tutorials by Kliment Andreev and Stephane Caron and an excellent documentation by letsencrypt.org.
- Before we start
- Configuring postfix
- Installing dovecot
- Adding security
- Amavisd, Spamassassin and clamav
- Proving that you are not a spammer
- Installing webmail client
Before we start
The first thing we need to do is to check if our ip is not blacklisted. You can do it on blacklistalert.org or mxtoolbox, just type in your IP and it will list its status. If you IP is blacklisted then you need to ask you ISP for a new one.
Prerequisites
This assumes that you have a working installation of CentOs 7.
So first let’s upgrade
yum -y upgrade
Before we begin we’ll need to install epel repository, so type
yum -y install epel-release
In our first step we will just configure postfix and dovecot server without any encryption and after we verify that we have a working email server we’ll add encryption, spam filter and message signing.
Configuring postfix
Now let’s create a user and group that we’ll use for postfix
groupadd vpostfix && useradd vpostfix -g vpostfix -s /sbin/nologin -c "Virtual postfix user" -d /var/empty
Next, we need to check uid and gid of our newly created group and user.
grep vpostfix /etc/passwd && grep vpostfix /etc/group
You will see something like this. Remember these numbers because we will need them later.
vpostfix:x:1000:1000:Virtual postfix user:/var/empty:/sbin/nologin
vpostfix:x:1000:
Now edit main.cf in /etc/postfix and change the following lines (of course, replacing example.com with your real domain)
myhostname = www.example.com
mydomain = example.com
myorigin = $mydomain
inet_interfaces = all
home_mailbox = Maildir/
Add the following to the end of main.cf (be careful to put the same uid and gid as the ones we have just created)
# Virtual domain config
virtual_mailbox_domains = /etc/postfix/virtual_domains
virtual_mailbox_base = /var/mail/vhosts
virtual_mailbox_maps = hash:/etc/postfix/vmailbox

# Make sure you replace these UID:GID numbers
virtual_minimum_uid = 1000
virtual_uid_maps = static:1000
virtual_gid_maps = static:1000
virtual_alias_maps = hash:/etc/postfix/virtual
Now we have to create a file for virtual domains named /etc/postfix/virtual_domains. In this file we will list all domains that this mail server will serve. Do not forget to configure MX records of all these domains so that they point to this server.
cd /etc/postfix/
touch virtual_domains
Now edit the file virtual_domains and put each domain your mail server is going to server on separate line.
#  Each domain is on separate line
example.com
example2.com
example3.com
After that, create the directory for email, and create all subdirectories for the domains. Our e-mail will be stored in these directories.
mkdir /var/mail/vhosts
chgrp -R vpostfix /var/mail
cd /var/mail/vhosts
mkdir example.com
mkdir example2.com
mkdir example3.com
cd ..
chown -R vpostfix:vpostfix vhosts
Postfix will now create the “Maildir” directories automatically and will assign them proper permissions.
Now, create a file /etc/postfix/vmailbox and in that file list all of the users for all the domains that will receive e-mails.
dragan@example.com        example.com/dragan/
john@example2.com         example2.com/john/
Be sure to end up each line with “/”, or mail will not be delivered.
Now, let’s create the virtual aliases file and create a local aliases file.
touch /etc/postfix/virtual
cd /etc
postalias aliases
When we’ve added all our users, we need to do the following to create the hashed files.
NOTE: These two commands need to be executed anytime you make a change to these files (virtual_domains and vmailbox).
postmap /etc/postfix/virtual
postmap /etc/postfix/vmailbox
You should restart postfix now so it can reload new settings.
systemctl restart postfix
You can check the log file with the command:
tail /var/log/maillog
You should see that the daemon is started, something like this:
Dec 18 08:00:30 sysname postfix/postfix-script[26682]: stopping the Postfix mail system
Dec 18 08:00:30 sysname postfix/master[1014]: terminating on signal 15
Dec 18 08:00:30 sysname postfix/postfix-script[26764]: starting the Postfix mail system
Dec 18 08:00:30 sysname postfix/master[26766]: daemon started -- version 2.10.1, configuration /etc/postfix
You can check if postfix is up and listens on port 25 with:
ps -eaf | grep postfix
root     26766     1  0 08:00 ?        00:00:00 /usr/libexec/postfix/master -w
postfix  26767 26766  0 08:00 ?        00:00:00 pickup -l -t unix -u
postfix  26768 26766  0 08:00 ?        00:00:00 qmgr -l -t unix -u
root     26793  8708  0 08:01 pts/0    00:00:00 grep --color=auto postfix

ss -l | grep smtp
u_str  LISTEN     0      100    private/smtp 42340                 * 0
tcp    LISTEN     0      100     *:smtp                  *:*
tcp    LISTEN     0      100    :::smtp                 :::*
If you don’t see anything in the log and you verified that postfix is listening on port 25 from the server itself, it is probably a firewall issue. Do not forget to open the SMTP port.
firewall-cmd --add-service=smtp --permanent
success
firewall-cmd --reload
success
Now is the time to test your email server. send a mail to user@example.com (of course, replacing user and example.com with your real username and domain names).
tail -f /var/log/maillog
you should see something like this:
Dec 18 08:04:32 example postfix/smtpd[27607]: connect from www.somedomain.com[46.101.163.203]
Dec 18 08:04:32 example postfix/smtpd[27607]: B5D433FDFE: client=www.somedomain.com[46.101.163.203]
Dec 18 08:04:32 example postfix/cleanup[27611]: B5D433FDFE: message-id=<5674045E.3010300@somedomain.com>
Dec 18 08:04:32 example postfix/qmgr[26768]: B5D433FDFE: from=<dragan@somedomain.com>, size=1700, nrcpt=1 (queue active)
Dec 18 08:04:32 example postfix/smtpd[27607]: disconnect from www.somedomain.com[46.101.163.203]
Dec 18 08:04:32 example postfix/virtual[27612]: B5D433FDFE: to=<dragan@example.com>, relay=virtual, delay=0.06, delays=0.03/0.03/0/0, dsn=2.0.0, status=sent (delivered to maildir)
Dec 18 08:04:32 example postfix/qmgr[26768]: B5D433FDFE: removed
After we’ve made sure we can receive e-mail we will now install dovecot.
Installing dovecot
yum -y install dovecot
We will now configure dovecot for simple authentication without any encryption. After we make sure dovecot is up and running we will add encryption.
Edit /etc/dovecot/dovecot.conf and uncomment the following line
protocols = imap pop3 lmtp
Then head to /etc/dovecot/conf.d directory and change the following files:
10-auth.conf
disable_plaintext_auth = no
#!include auth-system.conf.ext
!include auth-passwdfile.conf.ext
10-logging.conf
log_path = /var/log/dovecot.log
auth_verbose = no
auth_debug = no
verbose_ssl = no
10-mail.conf (be careful to put your vpostfix uid and gid)
mail_home = /var/mail/vhosts/%d/%n
mail_location = maildir:~
mail_uid = 1000    # Your vpostfix UID
mail_gid = 1000    # Your vpostfix GID
mail_privileged_group = vpostfix
10-master.conf
unix_listener auth-userdb {
  mode = 0600
  user = vpostfix
  group =  vpostfix
}
# Postfix smtp-auth
unix_listener /var/spool/postfix/private/auth {
  mode = 0666
  user = vpostfix
  group = vpostfix
}
10-ssl.conf
ssl = no
# ssl_cert = </etc/ssl/certs/dovecot.pem
# ssl_key = </etc/ssl/private/dovecot.pem
Creating users
In file /etc/dovecot/conf.d/10-auth.conf we have uncommented the line !include auth-passwdfile.conf.ext. If we check that file we’ll see the following:
passdb {
  driver = passwd-file
  args = scheme=CRYPT username_format=%u /etc/dovecot/users
}

userdb {
  driver = passwd-file
  args = username_format=%u /etc/dovecot/users

  # Default fields that can be overridden by passwd-file
  #default_fields = quota_rule=*:storage=1G

  # Override fields from passwd-file
  #override_fields = home=/home/virtual/%u
}
This file sets the location of our users file. Currently it is in /etc/dovecot/users. If you want to keep it elsewhere you need to change those lines.
Now let’s put our users in the file. We can create the hashed password with the following command:
doveadm pw -s SHA512-CRYPT
This will ask you for password and will give you a hash of your password. You should put it in /etc/dovecot/users like this:
dragan@example.com:{SHA512-CRYPT}$6$1PrBJZz7QsUJBhVw$Ww39ihL9UtPrdk/3ORrEj7NTueTa.hpjy9ufboLoH0EjQBUwk0brezb.wIYrZ6CarfR629XGGzoLazkoev3wp1::::
So, the format is your email, followed by colon, followed by hash line given by doveadm and followed by 4 colons. Since it can be pretty tedious job to copy-paste these lines for each of your users what I usually do is to just list the names of users in the file like this:
dragan@example.com
john@example2.com
...
and then use some script like this one below that will fill passwords for users:
username="$1"
password="$2"

newpassword=$(doveadm pw -s SHA512-CRYPT -p "${password}")
newrow=${username}':'${newpassword}'::::'

sed -i '/'$username'/c\'$newrow'' /etc/dovecot/users
With this solution your users will not be able to change their passwords. The only way to change the password is to type these commands in the console but we will see later how to make a script that will give them the ability to change their passwords through webmail client.
starting dovecot
systemctl start dovecot
systemctl enable dovecot
tail /var/log/dovecot.log
You should see something like this
Dec 21 08:29:13 master: Info: Dovecot v2.2.10 starting up for imap, pop3, lmtp (core dumps disabled)
Now, let’s check our e-mail. You can do that from the server using the telnet command.
For IMAP, do the following.
telnet localhost 143
Trying 127.0.0.1...
Connected to localhost.
Escape character is '^]'.
+ OK [CAPABILITY IMAP4rev1 LITERAL+ SASL-IR LOGIN-REFERRALS ID ENABLE IDLE AUTH=PLAIN] Dovecot ready.
? login dragan@example.com mypassword
? OK [CAPABILITY IMAP4rev1 LITERAL+ SASL-IR LOGIN-REFERRALS ID ENABLE IDLE SORT SORT=DISPLAY THREAD=REFERENCES THREAD=REFS THREAD=ORDEREDSUBJECT MULTIAPPEND URL-PARTIAL CATENATE UNSELECT CHILDREN NAMESPACE UIDPLUS LIST-EXTENDED I18NLEVEL=1 CONDSTORE QRESYNC ESEARCH ESORT SEARCHRES WITHIN CONTEXT=SEARCH LIST-STATUS SPECIAL-USE BINARY MOVE] Logged in
? list "" "*"
+ LIST (\HasNoChildren) "." INBOX
? OK List completed.
? logout
+ BYE Logging out
? OK Logout completed.
Connection closed by foreign host.
Now that we have our postfix and dovecot up and running, the next step will be to add some security
Adding security
Installing certificates from letsencrypt.org
The first thing we’ll do is to install certificates for our server. For that we’ll use certificate authority named let’s encrypt, it’s aim is to provide free certificates through automated process. The only drawback is that it uses port 80 for its work so if you have http server active you’ll have to stop it for now, we’ll show later how it can be automated without stopping it.
In this example I presume that you do not have your http server active. Also if you server has more than one cname you will have to get certificates for all its names. You can get certificates for each of your cnames (example.com, mail.example.com, www.example.com) or you can have one certificate for all your cnames. In this example I have asked for one certificate for multiple cnames, just substitute example.com with your domain name.
cd ~
yum -y install git
git clone https://github.com/letsencrypt/letsencrypt
cd letsencrypt
At this step it is important that you have port 80 open on your server, so if it is not already open, type the following:
firewall-cmd --add-port=80/tcp --permanent
firewall-cmd --reload
It is also important to have your DNS properly configured for all of the domains that you will be asking certificates for.
./letsencrypt-auto certonly --standalone -d example.com -d www.example.com -d mail.example.com -d webmail.example.com
This will first install additional packages if needed and configure a few things. Follow the instructions on the screen.
Our certificates are now stored in /etc/letsencrypt/live/example.com. These certificates are valid for three months only, so before they expire you will have to request new ones periodically.
Adding security to postfix
In /etc/postfix/main.cf add the following text to the end of file. Substitute your certificate directory in smtpd_tls_key_file and smtpd_tls_cert_file
# TLS
smtpd_use_tls = yes
smtpd_tls_security_level = may
smtpd_tls_auth_only = yes
smtpd_tls_key_file = /etc/letsencrypt/live/example.com/privkey.pem
smtpd_tls_cert_file = /etc/letsencrypt/live/example.com/fullchain.pem
smtpd_tls_loglevel = 1
smtpd_tls_received_header = yes
smtpd_tls_session_cache_timeout = 3600s
tls_random_source = dev:/dev/urandom

# SASL
smtpd_sasl_type = dovecot
broken_sasl_auth_clients = yes
smtpd_sasl_path = private/auth
smtpd_sasl_auth_enable = yes
smtpd_sasl_security_options = noanonymous
smtpd_recipient_restrictions = permit_sasl_authenticated, permit_mynetworks, reject_unauth_destination
smtpd_relay_restrictions = permit_sasl_authenticated, permit_mynetworks, reject_unauth_destination
After that edit the /etc/postfix/master.cf and remove the comments to look like this.
submission inet n       -       n       -       -       smtpd
  -o syslog_name=postfix/submission
  -o smtpd_tls_security_level=encrypt
  -o smtpd_sasl_auth_enable=yes
  -o smtpd_reject_unlisted_recipient=no
#  -o smtpd_client_restrictions=$mua_client_restrictions
#  -o smtpd_helo_restrictions=$mua_helo_restrictions
#  -o smtpd_sender_restrictions=$mua_sender_restrictions
  -o smtpd_recipient_restrictions=permit_sasl_authenticated,reject
  -o milter_macro_daemon_name=ORIGINATING
Restart postfix after these changes and add the following firewall rules.
systemctl restart postfix
firewall-cmd --add-port=587/tcp --permanent
firewall-cmd --reload
If you do telnet localhost 587 and type EHLO something.com you should see that postfix replies with STARTTLS.
telnet localhost 587
Trying ::1...
Connected to localhost.
Escape character is '^]'.
220 www.example.com ESMTP Postfix
ehlo example.com
250-www.example.com
250-PIPELINING
250-SIZE 10240000
250-VRFY
250-ETRN
250-STARTTLS
250-ENHANCEDSTATUSCODES
250-8BITMIME
250 DSN
quit
221 2.0.0 Bye
Connection closed by foreign host.
Now that we have postfix secured let’s do the same for dovecot
dovecot and SSL
Let’s head back to /etc/dovecot/conf.d directory
cd /etc/dovecot/conf.d
And then edit 10-auth.conf and change:
disable_plaintext_auth = yes
Then, edit 10-ssl.conf and change:
ssl = yes
ssl_cert = </etc/letsencrypt/live/example.com/fullchain.pem
ssl_key = </etc/letsencrypt/live/example.com/privkey.pem
Both postfix and dovecot should be able to use those certificates now, so you should restart them now.
systemctl restart postfix
systemctl restart dovecot
You can test SMTP SSL/TLS connection on port 587 with the following command:
openssl s_client -starttls smtp -connect localhost:587
Then type
ehlo example.com,
mail from:user@example.com.
If these steps work, you should be OK. To test SASL with postfix and dovecot, type:
doveadm auth test -a /var/spool/postfix/private/auth user@exmaple.com your_password
passdb: user@example.com auth succeeded
extra fields:
  user=user@example.com
If you want you can open the firewall for IMAPs and POP3s.
firewall-cmd --add-port=993/tcp --permanent
firewall-cmd --add-port=995/tcp --permanent
firewall-cmd --reload
You can now test your e-mail server by setting it up in your favourite e-mail client. You should be able to send and receive email. However your server is currently open to all kinds of spam and not all email providers will accept your emails (google mail will probably mark your messages as spam). So, let’s now configure your spam filter.
Amavisd, Spamassassin and clamav
To test email for spam you will need spamassassin, to test it for viruses you will need clamav and you will need amavisd which is an interface between these two programs and postfix. When you install amavisd-new, clamav and spamassassin will be installed automatically.
yum install -y amavisd-new
yum install -y clamav-update
First we need to configure amavisd. The configuration file is /etc/amavisd/amavisd.conf. Edit this file and make sure that these values are correct.
# @bypass_virus_checks_maps = (1);  # controls running of anti-virus code
# @bypass_spam_checks_maps  = (1);  # controls running of anti-spam code
# $bypass_decode_parts = 1;         # controls running of decoders&dearchivers
$daemon_user  = 'amavis';     # (no default;  customary: vscan or amavis), -u
$daemon_group = 'amavis';     # (no default;  customary: vscan or amavis), -g
$mydomain = 'example.com';   # a convenient default for other settings (change it)
$MYHOME = '/var/spool/amavisd';   # a convenient default for other settings, -H (remove the comment in front)
@local_domains_maps = ( [".$mydomain","myotherdomain.net"] );  # list of all local domains. If you have multiple domains, add the here.
$myhostname = 'host.example.com';  # must be a fully-qualified domain name! (remove the comment in front)


# ### http://www.clamav.net/
['ClamAV-clamd',
  \&ask_daemon, ["CONTSCAN {}\n", "/var/run/clamav/clamd.sock.sock"],
  qr/\bOK$/m, qr/\bFOUND$/m,
  qr/^.*?: (?!Infected Archive)(.*) FOUND$/m ],
# # NOTE: run clamd under the same user as amavisd - or run it under its own
# #   uid such as clamav, add user clamav to the amavis group, and then add
# #   AllowSupplementaryGroups to clamd.conf;
# # NOTE: match socket name (LocalSocket) in clamav.conf to the socket name in
# #   this entry; when running chrooted one may prefer a socket under $MYHOME.
A WORD OF ADVICE: Clamav and memory. For clamav to work properly it needs a lot of memory. At least two 2GB of ram memory is recommended. If you have 1GB or less you will need to turn off your virus scanner. You can do it by uncommenting the following line in /etc/amavisd/amavisd.conf:
@bypass_virus_checks_maps = (1); # controls running of anti-virus code
and commenting out the following lines in the same file:
# ### http://www.clamav.net/
#['ClamAV-clamd',
#  \&ask_daemon, ["CONTSCAN {}\n", "/var/run/clamav/clamd.sock.sock"],
#  qr/\bOK$/m, qr/\bFOUND$/m,
#  qr/^.*?: (?!Infected Archive)(.*) FOUND$/m ],
# # NOTE: run clamd under the same user as amavisd - or run it under its own
# #   uid such as clamav, add user clamav to the amavis group, and then add
# #   AllowSupplementaryGroups to clamd.conf;
# # NOTE: match socket name (LocalSocket) in clamav.conf to the socket name in
# #   this entry; when running chrooted one may prefer a socket under $MYHOME.
Now, we need to connect postfix to amavisd. Add the following lines at the end of /etc/postfix/master.cf
# Amavisd
amavisfeed unix - - n - 2 lmtp
        -o lmtp_data_done_timeout=1200
        -o lmtp_send_xforward_command=yes
127.0.0.1:10025 inet n - n - - smtpd
        -o content_filter=
        -o smtpd_delay_reject=no
        -o smtpd_client_restrictions=permit_mynetworks,reject
        -o smtpd_helo_restrictions=
        -o smtpd_sender_restrictions=
        -o smtpd_recipient_restrictions=permit_mynetworks,reject
        -o smtpd_data_restrictions=reject_unauth_pipelining
        -o smtpd_end_of_data_restrictions=
        -o smtpd_restriction_classes=
        -o mynetworks=127.0.0.0/8
        -o smtpd_error_sleep_time=0
        -o smtpd_soft_error_limit=1001
        -o smtpd_hard_error_limit=1000
        -o smtpd_client_connection_count_limit=0
        -o smtpd_client_connection_rate_limit=0
        -o receive_override_options=no_header_body_checks,no_unknown_recipient_checks,no_milters,no_address_mappings
        -o local_header_rewrite_clients=
        -o smtpd_milters=
        -o local_recipient_maps=
        -o relay_recipient_maps=
Edit /usr/local/etc/postfix/main.cf and add these lines at the end.
# Amavisd
content_filter = amavisfeed:[127.0.0.1]:10024
Now we need to prepare everything for antivirus scanner. If you have decided to opt-out of antivirus scanning you do not need to do these lines.
Edit /etc/freshclam.conf and remove or comment out the Example line.
# Comment or remove the line below.
Example
After that, edit /etc/sysconfig/freshclam and remove all 4 lines at the bottom.
### !!!!! REMOVE ME !!!!!!
### REMOVE ME: By default, the freshclam update is disabled to avoid
### REMOVE ME: network access without prior activation
FRESHCLAM_DELAY=disabled-warn   # REMOVE ME
You can now update antivirus definitions with the following command:
freshclam
And after that you can update spamassassins’s signatures.
sa-update -D
The “-D” option is to run in debug mode so you can see what’s going on. If there is an update available, spamassassin’s exit code is 0, if not the exit code is 1. In case there is an update, we’ll have to restart the spamassassin’s daemon.
Check the cron folder and make sure you see both clamav-update and sa-update files.
cd /etc/cron.d
ls -l clamav-update sa-update
Now, we can start everything.
systemctl start amavisd
systemctl enable amavisd
systemctl start spamassassin
systemctl enable spamassassin
Once you start amavisd, clamd starts as well. Finally, let’s restart postfix.
systemctl restart postfix
Check the connection between amavisd and postfix.
telnet localhost 10024
Type ehlo localhost and check the ouput. In my case it looks like this.
250-[127.0.0.1]
250-VRFY
250-PIPELINING
250-SIZE
250-ENHANCEDSTATUSCODES
250-8BITMIME
250-DSN
250 XFORWARD NAME ADDR PORT PROTO HELO IDENT SOURCE
Then do
telnet localhost 10025
Again, type ehlo localhost and check the ouput. In my case it looks like this.
250-www.example.org
250-PIPELINING
250-SIZE 10240000
250-VRFY
250-ETRN
250-STARTTLS
250-ENHANCEDSTATUSCODES
250-8BITMIME
250 DSN
Your email server should now be protected against spam and viruses. To test it go to Email Security Check and follow the instructions there. The system will send you 7 emails, all of them should be caught by amavisd.
Now that we’ve installed spam filter you have to prove that you are not a spammer. That means that every email will have to be signed using DKIM.
Proving that you are not a spammer - signing your email messages with openDKIM
yum install -y opendkim pypolicyd-spf
Now edit /etc/opendkim.conf and make sure it contains the following lines (change example.com to your domain)
Mode        sv
Domain          example.com
KeyTable           refile:/etc/opendkim/KeyTable
SigningTable       refile:/etc/opendkim/SigningTable
ExternalIgnoreList refile:/etc/opendkim/TrustedHosts
InternalHosts      refile:/etc/opendkim/TrustedHosts
LogWhy yes
Also, check the number of socket port for opendkim service, you will need it later
Socket inet:8891@localhost
Now we will create our signing keys
cd /etc/opendkim/keys
mkdir example.com
cd example.com
opendkim-genkey -s default -d example.com
chown opendkim:opendkim default.private
cd /etc/opendkim/
Edit /etc/opendkim/KeyTable and add the following line:
default._domainkey.example.com example.com:default:/etc/opendkim/keys/example.com/default.private
After that, edit /etc/opendkim/SigningTable and add the following
*@example.com default._domainkey.example.com
And finally edit /etc/opendkim/TrustedHosts and add your domain name and your full host name.
example.com
www.example.com
Now that we’ve configured opendkim we have to put the public key in our DNS record, so type the following
cat /etc/opendkim/keys/example.com/default.txt
You will get something like this:
default._domainkey      IN      TXT     ( "v=DKIM1; k=rsa; "
          "p=MIGfMA0GCSqGSIb3DQEBAQUAA4GNADCBiQKBgQCrIUYTOyl+IT3+CvGqZP0lgT5gPHKjVMIcm/GySA+0KP8/uK9JK2CM2Lu+i3qSCXlcVpvFMV8m5P5iRANkO3nGZXKOKPnabMvGt+Sa6INJd7LRR1OUKv+MzP9A83WVXTdwuy5nzr6bM03xin1E/3BimxS3xytzcGiFsnSL+UHn9wIDAQAB" )  ; ----- DKIM key default for example.com
Now use this to create a new DNS record for your domain. It has to be a TXT record where key is “default._domainkey” and value is the text inside the parenthesis (without the quotes).
While we are at your DNS records, you will also need to add two other TXT records, first add a nameless (@) TXT record with the following value (change YOUR_IPv4_ADDRESS AND YOUR_IPv6_ADDRESS to match your values):
v=spf1 a mx ip4:YOUR_IPv4_ADDRESS ip6:YOUR_IPv6_ADDRESS ~all
and then add the “_dmarc” TXT record with the following value:
v=DMARC1; p=none
Now let’s check if those values are visible.
yum install bind-utils
dig default._domainkey.example.com TXT
You should receive the same value that you’ve entered in your DNS record:
;; ANSWER SECTION:
default._domainkey.example.com. 1799 IN TXT "v=DKIM1\; k=rsa\; p=MIGfMA0GCSqGSIb3DQEBAQUAA4GNADCBiQKBgQCw7O7uyU/Lkn9BaQwA8obSm13EXwYf44QD+XMb2kdYbPhW4Q/NyITpR4DH+/GEYadHrN+7ezygVaG7J+Hg0u6YRL34QYN5fTVT/aon2X0GvJeT1xNsggYy50pHgTkVzYGhUyhhepHhxt2Yc12GVeibZj505MnvlvuMeU9Xs3iRiQIDAQAB"
We now have to modify postfix configuration and to tell it to use opendkim
Add the following to /etc/postfix/master.cf
policy-spf  unix  -       n       n       -       -       spawn
     user=nobody argv=/usr/libexec/postfix/policyd-spf
Change the following line in /etc/postfix/main.cf to
smtpd_recipient_restrictions = permit_sasl_authenticated, permit_mynetworks, reject_unauth_destination, check_policy_service, unix:private/policy-spf
And also add the following lines to /etc/postfix/main.cf. Port values for smtpd_milters and non_smtpd_milters should be the same as in “Socket” in /etc/opendkim.conf
policy-spf_time_limit = 3600s

# DKIM
milter_default_action = accept
milter_protocol = 6
smtpd_milters = inet:localhost:8891
non_smtpd_milters = inet:localhost:8891
Now let’s start opendkim and restart postfix.
systemctl start opendkim
systemctl enable opendkim
systemctl restart postfix
And that should be it.
You can check if dkim signature is added if you check your maillog and send an email.
tail -f /var/log/maillog
You should see a line similar to this
Dec 28 18:11:25 example opendkim[1169]: 03DD041429: DKIM-Signature field added (s=default, d=example.com)
If you send an email to your other email address and check the source you should see the DKIM signature in the header, it will look like this:
...
DKIM-Signature: v=1; a=rsa-sha256; c=relaxed/relaxed; d=example.com;
  s=default; t=1450868845;
  bh=1i0m94nmanDDd6Gu/03Obw9meKedLOruAZb2JFtSyfY=;
  h=To:From:Subject:Date:From;
  b=TvscdTJaWJps1khxQ5dqw/TWLkZbSWhZqPa0JnnuG076Xom2KJDFzQSBLz7XVylKS
   jVtdw7q23QAslgzcDHLPT/099f7dB4x4gPwABuN6W0Km7B8EGJYI/0QCmp359PfalT
   nr8Pv5EoC1pbRS+oaMGDamRVF8zHfHpp5MO8OYRM=
...
You can also check your e-mail score on www.mail-tester.com. If everything went well you should receive a perfect score of 10/10. Your e-mail server is now fully configured and ready to send and receive e-mail. If you wish you can also install webmail client but that step is optional.
Installing webmail client
There are a lot of open source webmail clients, which one you choose to install is up to you. If you want simplicity you can choose squirrelmail, or if you want something modern you can choose one of many web 2.0 clients. In this example we will install Rainloop webmail client.
We shall set up our webmail server to be accessible on webmail.example.com so be sure to set up the appropriate DNS record.
yum -y install httpd php unzip mod_ssl
cd /var/www/html
mkdir webmail
wget http://repository.rainloop.net/v2/webmail/rainloop-community-latest.zip
unzip rainloop-community-latest.zip
rm rainloop-community-latest.zip
cd ..
chown -R apache.apache webmail

firewall-cmd --add-port=443/tcp --permanent
firewall-cmd --reload
Now edit the file /etc/httpd/conf.d/ssl.conf. Find the section and add the following lines:
<VirtualHost _default_:443>

# General setup for the virtual host, inherited from global configuration
DocumentRoot "/var/www/html/webmail"
ServerName webmail.example.com:443
In the same section change the following lines:
#   Server Certificate:
# Point SSLCertificateFile at a PEM encoded certificate.  If
# the certificate is encrypted, then you will be prompted for a
# pass phrase.  Note that a kill -HUP will prompt again.  A new
# certificate can be generated using the genkey(1) command.
SSLCertificateFile /etc/letsencrypt/live/example.com/cert.pem

#   Server Private Key:
#   If the key is not combined with the certificate, use this
#   directive to point at the key file.  Keep in mind that if
#   you've both a RSA and a DSA private key you can configure
#   both in parallel (to also allow the use of DSA ciphers, etc.)
SSLCertificateKeyFile /etc/letsencrypt/live/example.com/privkey.pem

#   Server Certificate Chain:
#   Point SSLCertificateChainFile at a file containing the
#   concatenation of PEM encoded CA certificates which form the
#   certificate chain for the server certificate. Alternatively
#   the referenced file can be the same as SSLCertificateFile
#   when the CA certificates are directly appended to the server
#   certificate for convinience.
SSLCertificateChainFile /etc/letsencrypt/live/example.com/chain.pem
We have now installed our certificates into http server.
now start the httpd server
systemctl enable httpd
systemctl start httpd
You can now try to access your webmail server on https://webmail.example.com. It should give you the login screen. First you need to configure it, so open the admin page on https://webmail.example.com/?admin. It will open a login page to the admin panel. Default login for is “admin”, password “12345” so be sure to change it immediately after login. Setting up rainloop webmail is pretty straightforward, click on “domains” and there click on “add domain” button. There you can set up access to your mail server.
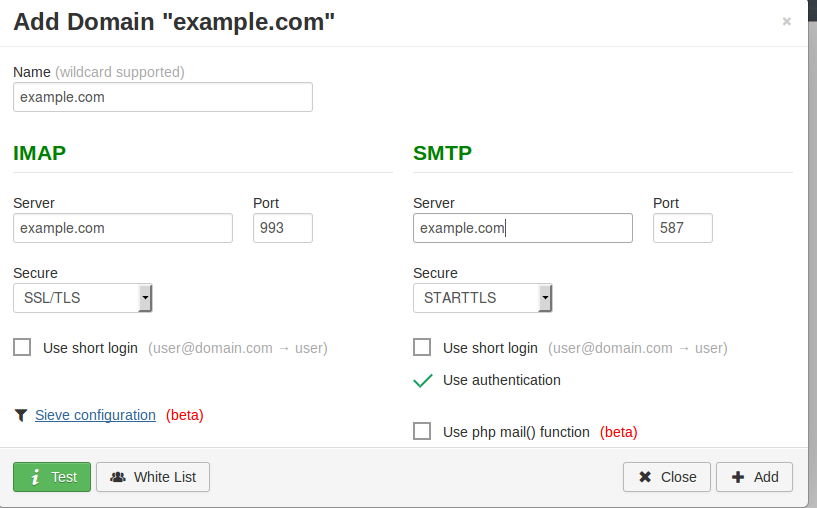
Type your domain name there like shown on the picture and press “test” button. If everything is ok, click to “add” and then “close”. And there it is, your webmail server is set up.
Bonus track: giving users a way to change their passwords.
If you remember when we were creating passwords for our e-mail users we mentioned that the only way to change the password would be to log in to server terminal and to change it by hand. Now that we have a working webmail we can use it to enable users to change their own passwords. For that we will use rainloop’s own change password example.
you should first download rainloop’s source
cd ~
git clone https://github.com/RainLoop/rainloop-webmail.git
For rainloop to be able to change password we need to create a script and it needs to be able to access the file. Therefore we will move our password file somewhere where rainloop can access it. We shall put it in /var/www/dovecot directory and of course we have to tell dovecot the new location of the file.
mkdir /var/www/dovecot
mv /etc/dovecot/users /var/www/dovecot
Now that we have moved the file we need to change the configuration file of the dovecot. Edit the file /etc/dovecot/conf.d/10-auth.conf and change value /etc/dovecot/users it to /var/www/dovecot/users like this:
passdb {
  driver = passwd-file
  args = scheme=CRYPT username_format=%u /var/www/dovecot/users
}

userdb {
  driver = passwd-file
  args = username_format=%u /var/www/dovecot/users
}
After that we need to restart dovecot to reload the changes
systemctl restart dovecot
We will now create a script that will change password on rainloop’s demand.
cd /var/www/dovecot
touch pwdchange.sh
chmod +c pwdchange.sh
chown -R apache.apache /var/www/dovecot
Now edit the pwdchange.sh and put the following:
username="$1"
password="$2"

newpassword=$(doveadm pw -s SHA512-CRYPT -p "${password}")
newrow=${username}':'${newpassword}'::::'

sed -i '/'$username'/c\'$newrow'' /var/www/dovecot/users
This script takes two arguments, the first one is username whose password is to be changed and the second one is the new password. You can call it like this:
./pwdchange.sh dragan@example.com mynewpassword
Or if you want a passphrase you can put it in quotation marks:
./pwdchange.sh dragan@example.com "my new passphrase"
Now that we have moved users file and the script is ready we can create rainloop plugin that will use it.
We will now use rainloop’s change password example plugin and to copy it to our rainloop installation.
cd /var/www/html/webmail/data/_data_/_default_/plugins/
mkdir change-password-mydomain
cd ~/rainloop-webmail/plugins/change-password-example
cp * /var/www/html/webmail/data/_data_/_default_/plugins/change-password-mydomain
cd /var/www/html/webmail/data/_data_/_default_/plugins
chown -R apache.apache change-password-mydomain
cd change-password-mydomain
Now edit the file ChangePasswordExampleDriver.php, locate the function called ChangePassword and under the //TODO add the following line
exec('/var/www/dovecot/pwdchange.sh '.$oAccount->Email().' "'.$sNewPassword.'"');
And there it is. Now all you have to do is login to webmail with Admin password, go to settings, click on enable plugins and check on change-password-mydomain plugin and that’s it. Your users will now be able to change their passwords from their webmail.